
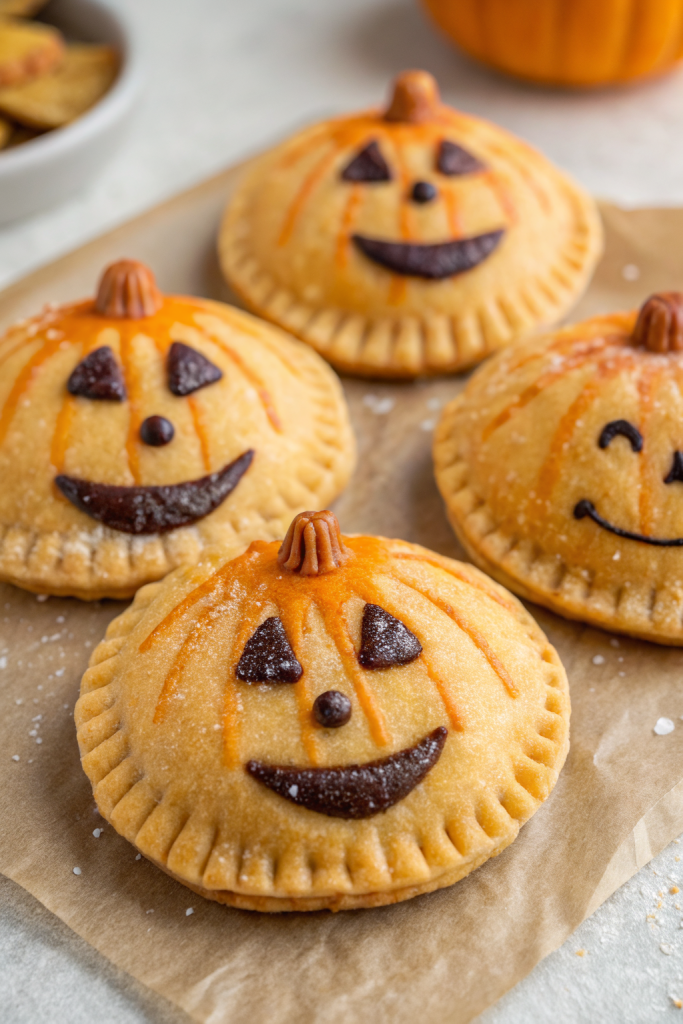
Pumpkin Shaped Mini Apple Pies Recipe tastes like a cozy fall afternoon with buttery, flaky crust and gooey cinnamon apples in every bite. This small-batch dessert works perfectly for holiday parties, bake sales, or weeknight treats and takes about 1 hour from start to finish. I tested these with my kids, my neighbors, and my very picky mail carrier, and not a single crumb survived.
Why Pumpkin Shaped Mini Apple Pies Recipe Is Worth It
These pumpkin shaped mini apple pies look adorable on a dessert table, yet they use simple ingredients and basic techniques. You get all the flavor of classic apple pie in a handheld, kid-friendly package that people devour in two bites.
The pumpkin shape also makes portion control easier, which helps when you already ate half the mashed potatoes. They travel well, reheat nicely, and work as a make-ahead dessert for busy holidays.
“These Pumpkin Shaped Mini Apple Pies taste like a bakery treat but look like something straight off a magazine cover. ★★★★★”
Ingredients You Need
For the pumpkin pie crusts
- 2 store-bought refrigerated pie crusts, chilled (I like Pillsbury or Trader Joe’s; use your favorite brand)
- 1 large egg, beaten (for egg wash; use milk or cream if you avoid egg)
- 1 tablespoon milk or cream (mix with egg for deeper color)
- 1–2 drops orange gel food coloring (optional, for a pumpkin hue; avoid liquid food color because it softens the dough)
- 1 tablespoon coarse sugar or turbinado sugar (for sparkle and crunch on top)
For the apple pie filling
- 3 medium apples, peeled, cored, and finely diced (use Honeycrisp, Pink Lady, or Granny Smith for best flavor)
- 2 tablespoons unsalted butter
- 1/3 cup light brown sugar, packed
- 1 tablespoon granulated sugar
- 1 1/2 teaspoons ground cinnamon
- 1/4 teaspoon ground nutmeg
- 1/8 teaspoon ground cloves (optional, strong but tasty)
- Pinch of salt
- 1 1/2 tablespoons cornstarch (or 2 tablespoons all-purpose flour as a thickener)
- 1 teaspoon lemon juice (brightens the flavor and balances sweetness)
- 1 teaspoon pure vanilla extract
Optional decorative touches
- Whole cloves for “pumpkin stems” (remove before eating if you dislike strong clove flavor)
- Extra pie dough scraps for leaf shapes or extra pumpkin ridges
Equipment list
- Large skillet or saucepan
- Mixing bowls
- Rolling pin (even with pre-made crusts, you may roll slightly thinner)
- Pumpkin-shaped cookie cutter (about 3–3.5 inches wide) or a sharp paring knife
- Fork for crimping edges
- Pastry brush
- Baking sheet
- Parchment paper or silicone baking mat
- Cooling rack
Quick Tips & substitutions
- Use store-bought pie crust to save time; homemade crust works too if you already have a favorite recipe.
- Choose firm apples that hold shape; mix sweet (Honeycrisp) and tart (Granny Smith) for balanced flavor.
- Dice apples small so they cook quickly and fit inside the mini pies without bursting.
- Swap butter with vegan butter and use a non-dairy milk wash for a dairy-free version.
- Skip egg wash and brush with oat milk or almond milk if you avoid eggs.
- Replace cornstarch with flour if that sits in your pantry already; just use a bit more.
- Chill assembled pies 10–15 minutes before baking to keep the pumpkin shape sharp.
- If you lack a pumpkin cutter, trace a cardboard pumpkin template and cut around it with a knife.
How to Make Pumpkin Shaped Mini Apple Pies Recipe
Step 1: Cook the apple filling
Heat a large skillet over medium heat and add the butter. When the butter melts and foams, add the diced apples, brown sugar, granulated sugar, cinnamon, nutmeg, cloves, and a pinch of salt. Stir often and cook until the apples soften but still hold shape, about 6–8 minutes.
Sprinkle cornstarch over the apples and stir well to coat. Cook 1–2 more minutes until the juices thicken and look glossy. Turn off the heat, stir in lemon juice and vanilla, then spread the filling on a plate to cool while you work with the dough.
Step 2: Prep the pie dough and color it
Line a baking sheet with parchment paper and set it aside. Unroll one pie crust on a lightly floured surface and smooth out any cracks with your fingers. If you want orange pumpkins, whisk the egg and milk together, then stir in a drop or two of orange gel color until it looks like a pale pumpkin shade.
Brush a thin layer of the colored egg wash over the surface of the dough. Do not soak it; you just want a light tint. Chill the dough in the fridge for 5–10 minutes so it firms up again.
Step 3: Cut pumpkin shapes
Use a pumpkin-shaped cookie cutter to cut as many pumpkins as possible from the chilled dough. Place the pumpkin cutouts on the prepared baking sheet. Gather dough scraps, press them together gently, and roll again to cut more shapes.
Repeat with the second pie crust, tinting it the same way if you want all pumpkins colored. Aim for an even number of pumpkin shapes so each mini pie has a top and bottom. Chill the cutouts while you set up the filling station.
Step 4: Fill the mini pies
Preheat your oven to 375°F (190°C). Lay half of the pumpkin cutouts on the baking sheet as the bottoms, spacing them slightly apart. Spoon a small mound of cooled apple filling into the center of each bottom piece, leaving a border around the edges.
Do not overfill; about 1–1 1/2 tablespoons per pie usually works. Place a second pumpkin cutout on top of each mound of filling. Gently press around the edges with your fingers to seal.
Step 5: Add pumpkin details and vent holes
Use the back of a knife to press gentle curved lines from top to bottom on each pumpkin to mimic pumpkin ridges. Do not cut through the dough; just score the surface lightly. Use a sharp knife to cut a tiny slit or “X” near the top of each pumpkin so steam can escape.
If you like, press a whole clove at the top of each pumpkin as a decorative stem. You can also cut tiny leaves from dough scraps and attach them near the top with a dab of egg wash. Keep everything chilled while you mix the final egg wash.
Step 6: Brush and bake
Brush the tops of the mini pies with the remaining egg wash. Sprinkle coarse sugar over each pumpkin for crunch and sparkle. Slide the baking sheet into the oven and bake 18–22 minutes, until the crust turns deep golden and the edges look crisp.
If your oven browns unevenly, rotate the pan halfway through baking. When the pies finish baking, move them to a cooling rack and let them cool at least 10–15 minutes before serving. The filling thickens as it cools, which keeps the first bite from burning your tongue.
Recipe Variations
- Gluten-free: Use a gluten-free pie crust and confirm your cornstarch and flavorings carry gluten-free labels.
- Vegan: Use vegan pie dough, swap butter with plant-based butter, and brush tops with non-dairy milk instead of egg wash.
- Low sugar: Cut the sugar in the filling by half and lean on naturally sweet apples like Fuji or Gala.
- Spice twist: Add a pinch of cardamom or use apple pie spice instead of separate spices.
- Caramel version: Drizzle a little thick caramel sauce over the apples before sealing the pies.
- Nutty crunch: Sprinkle chopped pecans or walnuts over the filling for extra texture.
Ways to Serve Pumpkin Shaped Mini Apple Pies Recipe
- Serve warm with a scoop of vanilla ice cream or cinnamon ice cream.
- Pack them in lunchboxes as a fun fall dessert.
- Set them on a platter for Thanksgiving or Halloween parties as a grab-and-go treat.
- Pair with hot apple cider, chai, or a mug of strong coffee.
- Add them to a dessert board with sliced apples, caramel dip, and spiced nuts.
Storage Success
Let the pumpkin shaped mini apple pies cool completely before you store them, or condensation will soften the crust. Place them in an airtight container and keep them at room temperature for up to 2 days. For longer storage, refrigerate them for up to 4 days and reheat in a 325°F oven for 8–10 minutes to crisp the crust again. You can also freeze baked pies for up to 2 months, then thaw in the fridge and warm them in the oven before serving.
Pumpkin Shaped Mini Apple Pies Recipe
Ingredients
Instructions
- Heat a large skillet over medium heat and add the butter. When the butter melts and foams, add the diced apples, brown sugar, granulated sugar, cinnamon, nutmeg, cloves, and a pinch of salt.
- Stir often and cook until the apples soften but still hold their shape, about 6–8 minutes.
- Sprinkle the cornstarch over the apples and stir well to coat. Cook for 1–2 more minutes, until the juices thicken and look glossy.
- Turn off the heat, stir in the lemon juice and vanilla, then spread the filling on a plate to cool while you work with the dough.
- Line a baking sheet with parchment paper and set aside. Unroll one pie crust on a lightly floured surface and smooth out any cracks with your fingers.
- In a small bowl, whisk the egg and milk together, then stir in 1–2 drops of orange gel food coloring if you want pumpkin-colored crusts.
- Brush a thin layer of the colored egg wash over the surface of the dough without soaking it. Chill the dough in the refrigerator for 5–10 minutes so it firms up again.
- Use a pumpkin-shaped cookie cutter to cut as many pumpkins as possible from the chilled dough and place the cutouts on the prepared baking sheet.
- Gather the dough scraps, press them together gently, roll out again, and cut more pumpkin shapes.
- Repeat the tinting and cutting process with the second pie crust. Aim for an even number of pumpkin shapes so each mini pie has a top and a bottom. Chill the cutouts while you prepare to fill them.
- Preheat your oven to 375°F (190°C). Lay half of the pumpkin cutouts on the baking sheet as the bottoms, spacing them slightly apart.
- Spoon about 1–1 1/2 tablespoons of cooled apple filling into the center of each bottom piece, leaving a clean border around the edges.
- Place a second pumpkin cutout on top of each mound of filling and gently press around the edges with your fingers to seal.
- Use the back of a knife to press gentle curved lines from top to bottom on each pumpkin to mimic pumpkin ridges without cutting through the dough.
- Use a sharp knife to cut a tiny slit or X near the top of each pumpkin to allow steam to escape during baking.
- If desired, press a whole clove into the top of each pumpkin as a decorative stem and add small leaf shapes cut from dough scraps. Keep the assembled pies chilled while you mix the remaining egg wash if needed.
- Brush the tops of the mini pies with any remaining egg wash and sprinkle with coarse or turbinado sugar.
- Bake for 18–22 minutes, or until the crust is deep golden and the edges look crisp, rotating the pan halfway through if your oven browns unevenly.
- Transfer the pies to a cooling rack and let them cool for at least 10–15 minutes before serving so the filling can thicken and cool slightly.
Notes
Approximate per 1 mini pie (about 1 of 10): 190 calories; fat 9 g; saturated fat 4 g; carbohydrates 27 g; fiber 1 g; sugars 12 g; protein 2 g; sodium 160 mg. Values will vary based on exact pie crust brand, apple variety, and decorative additions.
Leave a Reply