
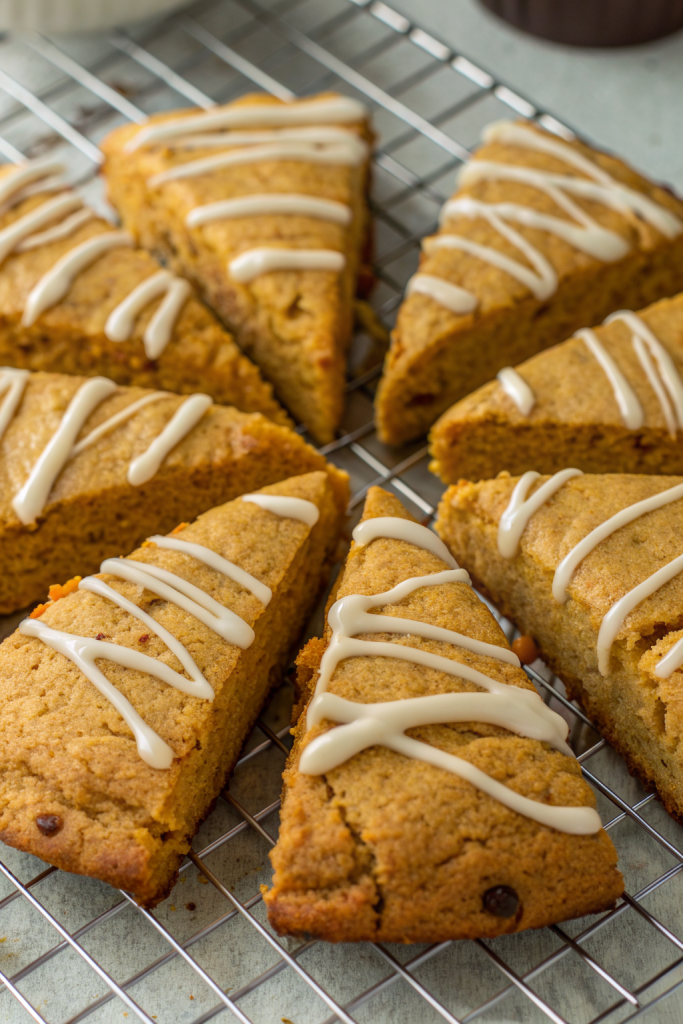
Flaky Pumpkin Scones with Vanilla Icing taste like a cozy October morning baked into a tender, buttery triangle with warm spices and a sweet, creamy drizzle on top. They work perfectly for fall brunches, bake sales, or lazy weekend breakfasts, and you can pull them off in about 40 minutes start to finish. I tested these so many times that my neighbors now judge the seasons by when pumpkin scones show up at their door.
Why Flaky Pumpkin Scones with Vanilla Icing Is Worth It
These pumpkin scones hit that sweet spot between tender and crisp, with flaky layers that pull apart instead of crumbling into dust. The pumpkin puree keeps the inside soft and moist, while cold butter and a hot oven give the edges that bakery-style crunch.
You get all the cozy pumpkin spice flavor without a sugar bomb, and the vanilla icing adds just enough sweetness. They feel fancy enough for guests, but the method stays simple enough for a sleepy Sunday morning baker.
“These Flaky Pumpkin Scones with Vanilla Icing taste like a bakery treat but come together in my tiny kitchen without any drama. ★★★★★”
Ingredients You Need
Dry ingredients
- 2 1/4 cups (280 g) all-purpose flour
- 1/3 cup (65 g) granulated sugar
- 1/4 cup (50 g) light brown sugar, packed
- 1 tablespoon baking powder
- 1 teaspoon ground cinnamon
- 1/2 teaspoon ground ginger
- 1/4 teaspoon ground nutmeg
- 1/4 teaspoon ground cloves (or allspice if you prefer milder flavor)
- 3/4 teaspoon fine sea salt
Use a good-quality all-purpose flour like King Arthur or Gold Medal for consistent results. Pumpkin spice blend works as a shortcut if you do not want to measure individual spices; use 2 to 2 1/2 teaspoons and skip the separate cinnamon, ginger, nutmeg, and cloves.
Cold ingredients
- 1/2 cup (1 stick, 113 g) unsalted butter, very cold, cut into small cubes
- 1/2 cup (120 ml) cold heavy cream or half-and-half
- 1 large egg, cold
- 2/3 cup (150 g) pumpkin puree (not pumpkin pie filling)
- 1 1/2 teaspoons pure vanilla extract
Use real pumpkin puree, not the pre-sweetened canned pie mix. I like Libby’s or Whole Foods 365 pumpkin because they run thick and not watery, which keeps the dough from turning sticky. Chill the butter, egg, and cream right until you need them, since cold fat gives you those flaky layers.
Optional add-ins
- 1/2 cup mini chocolate chips
- 1/2 cup chopped toasted pecans or walnuts
- 2 tablespoons coarse sugar for sprinkling on top before baking
Mini chocolate chips melt into little pockets of sweetness. Nuts add crunch and make the scones feel extra bakery-style. Coarse sugar on top gives sparkle and a little crackly bite.
Vanilla icing
- 1 1/2 cups (180 g) powdered sugar, sifted
- 2–3 tablespoons milk or cream
- 1 1/2 teaspoons pure vanilla extract
- Pinch of salt
Use whole milk or cream for a thicker, richer icing. If you want a stronger vanilla flavor, add 1/4 teaspoon vanilla bean paste along with the extract. A tiny pinch of salt keeps the icing from tasting flat or cloying.
Equipment list
- Large mixing bowl
- Medium mixing bowl
- Whisk and rubber spatula
- Pastry cutter, fork, or box grater
- Bench scraper or sharp knife
- Parchment-lined baking sheet
- Measuring cups and spoons (or a kitchen scale if you have one)
- Cooling rack
A pastry cutter makes quick work of the butter, but a box grater and your fingers handle the job just fine. A bench scraper helps you shape and cut the dough without overworking it. Parchment keeps the bottoms from over-browning and makes cleanup easy.
Quick Tips & substitutions
- Use very cold butter and cream so the scones puff and flake instead of spreading.
- Chill the shaped dough in the fridge for 15–20 minutes before baking if your kitchen runs warm.
- Swap pumpkin spice blend (2–2 1/2 teaspoons) for the individual spices to save time.
- Use half-and-half instead of heavy cream if that sits in your fridge already; just brush a little extra on top for color.
- Replace up to half the all-purpose flour with white whole wheat flour for a heartier texture.
- Use coconut milk and vegan butter sticks for a dairy-free version, and choose a flax egg (1 tablespoon ground flax + 3 tablespoons water) in place of the egg.
- Pat the dough gently instead of kneading so you keep the layers and avoid tough scones.
- Cut the butter into pea-sized bits; if it starts to soften, pop the bowl in the fridge for 5–10 minutes.
- Use a sharp knife or bench scraper to cut clean wedges so the edges rise nicely.
- Drizzle the vanilla icing on fully cooled scones so it sets instead of sliding right off.
How to Make Flaky Pumpkin Scones with Vanilla Icing
Step 1: Mix the dry ingredients
Add the flour, granulated sugar, brown sugar, baking powder, cinnamon, ginger, nutmeg, cloves, and salt to a large bowl. Whisk until everything looks evenly combined and no brown sugar clumps remain. This step spreads the leavening and spices evenly so each scone bakes and tastes the same.
Step 2: Cut in the cold butter
Drop the cold butter cubes into the flour mixture. Use a pastry cutter, fork, or your fingers to cut the butter into the flour until you see pea-sized pieces and some smaller sandy bits. Work quickly so the butter stays cold and visible, since those little chunks melt in the oven and create flaky pockets.
If you use a box grater, grate the cold butter on the large holes right into the bowl, then toss it with the flour. Coat every shred of butter with flour so it does not clump together. If the mixture starts to feel warm, slide the bowl into the fridge for 5–10 minutes.
Step 3: Whisk the wet ingredients
In a separate medium bowl, whisk the pumpkin puree, egg, cream, and vanilla until smooth. Scrape down the sides of the bowl so no streaks of pumpkin hide at the bottom. The mixture should look thick but pourable, like a loose pumpkin custard.
If your pumpkin looks very watery, blot it with paper towels before you mix it in. Excess moisture can make the dough sticky and heavy. A thicker pumpkin puree gives the scones better structure and more lift.
Step 4: Bring the dough together
Pour the pumpkin mixture into the flour and butter mixture. Use a rubber spatula to fold the wet and dry ingredients together with gentle strokes. Stop when the dough looks shaggy and you still see a few dry flour spots.
If you use chocolate chips or nuts, sprinkle them over the dough at this point and fold a few more times. The dough should feel slightly sticky but still hold together when you press it. If it feels too dry and crumbly, drizzle in 1–2 teaspoons of cream; if it feels too wet, dust lightly with flour.
Step 5: Shape the scones
Turn the dough out onto a lightly floured surface. Gently pat it into a rough rectangle, then fold it in half like a book. Turn it 90 degrees and pat it out again, then fold once more; this quick layering step gives extra flakiness without much effort.
Pat the dough into a circle about 7–8 inches across and about 1 inch thick. Use a bench scraper or sharp knife to cut the circle into 8 equal wedges. Transfer the wedges to a parchment-lined baking sheet, spacing them a bit apart so they have room to puff.
Step 6: Chill and preheat
Slide the baking sheet with the shaped scones into the fridge. Chill them for 15–20 minutes while you heat the oven to 400°F (200°C). This chill time firms the butter and relaxes the gluten so the scones rise tall instead of spreading.
During this time, you can rinse your bowls and set up the icing ingredients. If you want extra golden tops, brush the chilled scones lightly with a bit of cream. A sprinkle of coarse sugar adds crunch and sparkle.
Step 7: Bake the pumpkin scones
Place the chilled scones in the hot oven. Bake for 16–20 minutes, until the tops look set and lightly golden and the edges show a deeper color. The bottoms should feel firm but not hard when you lift one gently with a spatula.
If your oven runs hot, start checking at 14–15 minutes. Rotate the pan once halfway through baking if your oven browns unevenly. When the scones finish baking, move the pan to a cooling rack and let them cool at least 15–20 minutes before icing.
Step 8: Mix the vanilla icing
Add the powdered sugar, 2 tablespoons milk or cream, vanilla, and a pinch of salt to a bowl. Whisk until smooth and glossy. If the icing looks too thick to drizzle, add milk 1 teaspoon at a time; if it looks too thin, sift in a little more powdered sugar.
You want a slow ribbon that falls off the whisk and holds a line on itself for a few seconds. Taste and adjust the vanilla or salt if you want a stronger flavor. Keep the icing at room temperature so it stays fluid while you drizzle.
Step 9: Drizzle and finish
Once the pumpkin scones cool to just slightly warm or room temperature, drizzle the vanilla icing over the tops in zigzags or crosshatch lines. You can spoon the icing or use a small zip-top bag with a tiny corner snipped off. The icing will set in about 20–30 minutes, depending on your kitchen temperature.
If you want a thicker icing cap, dip the tops of the scones directly into the bowl, then set them back on the rack to drip. Add a light dusting of cinnamon over the wet icing if you like a speckled look. Serve once the icing sets enough that it does not smear when you pick them up.
Recipe Variations
- Gluten-free: Use a 1:1 gluten-free baking flour blend and chill the shaped dough a bit longer to help it hold shape.
- Vegan: Use vegan butter sticks, coconut milk or oat milk, and a flax egg; use plant-based milk in the icing as well.
- Low sugar: Cut the sugar in the dough by one-third and drizzle a thinner layer of icing or skip it and brush with cream and cinnamon sugar only.
- Whole grain: Swap 1 cup of the all-purpose flour with white whole wheat flour for a nuttier flavor and slightly denser crumb.
- Extra spice: Add a pinch of black pepper or cardamom to the dry ingredients for a more complex spice profile.
- Chocolate lovers: Fold in 1/2 cup mini chocolate chips and drizzle a little melted dark chocolate over the vanilla icing.
- Nutty version: Add 1/2 cup chopped toasted pecans or walnuts to the dough and sprinkle a few on top of the icing.
Ways to Serve Flaky Pumpkin Scones with Vanilla Icing
- Pair with hot coffee, chai, or a simple black tea for a cozy breakfast.
- Serve on a brunch board with fresh fruit, yogurt, and hard-boiled eggs.
- Pack in lunchboxes as a special fall treat.
- Warm slightly in the microwave and enjoy with a glass of cold milk.
- Slice in half and spread with a thin layer of cream cheese or almond butter.
Storage Success
Store leftover Flaky Pumpkin Scones with Vanilla Icing in an airtight container at room temperature for up to 2 days. Line the container with a paper towel to absorb extra moisture and keep the edges from turning soggy. If you want to keep them longer, freeze the baked, un-iced scones for up to 2 months, then thaw at room temperature and add fresh vanilla icing. Reheat scones in a 300°F oven for 8–10 minutes to bring back the flaky texture before serving.
Flaky Pumpkin Scones with Vanilla Icing
Ingredients
Instructions
- Preheat the oven to 400°F (200°C) and line a baking sheet with parchment paper.
- In a large bowl, whisk together the flour, granulated sugar, brown sugar, baking powder, cinnamon, ginger, nutmeg, cloves, and salt until well combined and no brown sugar clumps remain.
- Add the cold butter cubes to the dry ingredients. Use a pastry cutter, fork, or your fingers to cut the butter into the flour until you have pea-sized pieces and some smaller sandy bits. Work quickly so the butter stays cold.
- In a separate medium bowl, whisk together the pumpkin puree, cold egg, cream or half-and-half, and vanilla until smooth and evenly combined.
- Pour the pumpkin mixture into the flour and butter mixture. Gently fold with a rubber spatula until the dough just comes together and looks shaggy with a few dry spots. If using chocolate chips or nuts, fold them in at this stage.
- Turn the dough out onto a lightly floured surface. Gently pat it into a rough rectangle, fold it in half like a book, turn 90 degrees, and pat out again. Fold once more to create quick layers, then pat into a 7–8 inch circle about 1 inch thick.
- Use a sharp knife or bench scraper to cut the dough circle into 8 equal wedges. Transfer the wedges to the prepared baking sheet, spacing them slightly apart. If desired, brush the tops lightly with a bit of cream and sprinkle with coarse sugar.
- Chill the shaped scones on the baking sheet in the refrigerator for 15–20 minutes to firm the butter and help them rise well.
- Bake the scones for 16–20 minutes, until the tops are set and lightly golden and the edges are deeper golden brown. Transfer the pan to a cooling rack and let the scones cool for at least 15–20 minutes before icing.
- In a medium bowl, whisk together the powdered sugar, 2 tablespoons of milk or cream, vanilla, and a pinch of salt until smooth and glossy. Add more milk a teaspoon at a time if needed to reach a thick but pourable consistency.
- Once the scones are just slightly warm or at room temperature, drizzle the vanilla icing over the tops in zigzags or lines. Let the icing set for 20–30 minutes before serving.
Notes
Approximate per 1 scone (1 of 8, with icing, without optional add-ins): 320 calories; fat 14 g; saturated fat 9 g; carbohydrates 45 g; fiber 1 g; sugars 22 g; protein 5 g; sodium 260 mg. Values are estimates and will vary based on brands, add-ins, and portion size.