
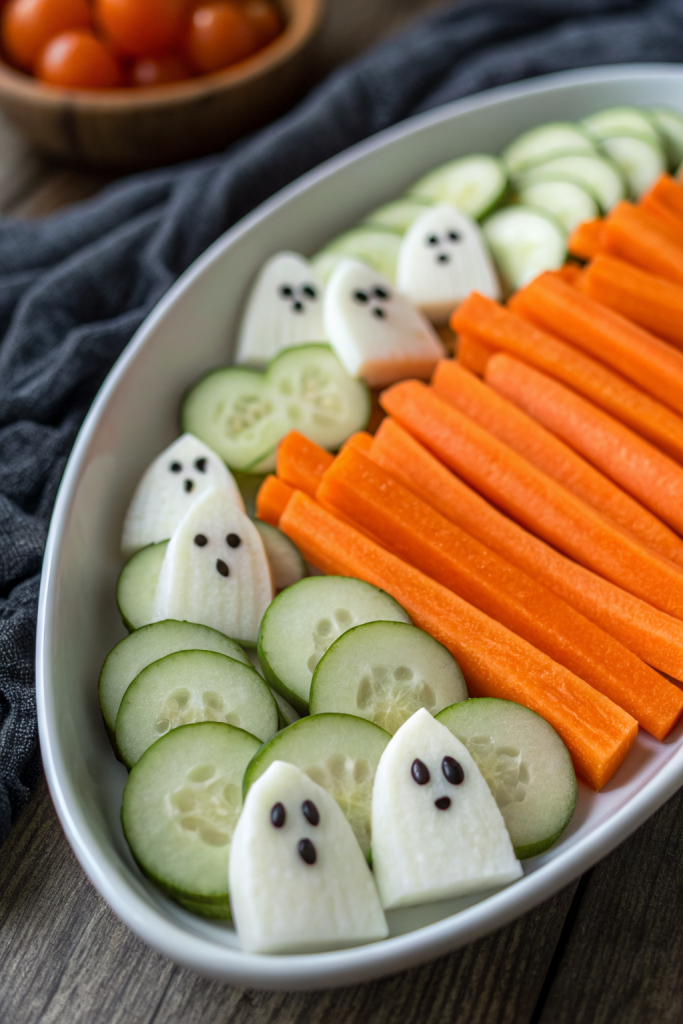
Spooky Veggie Plate Idea tastes crisp, fresh, and a little wicked in the best way, with creamy dips and crunchy veggies that feel like a party on a platter. It works perfectly for Halloween parties, kids’ snack boards, or office potlucks and comes together in about 25 to 35 minutes, depending on how fancy you go with the veggie art. I tested this on my own nieces, and they ate more raw vegetables in one night than they did all summer.
Why You Should Try This Spooky Veggie Plate Idea
This Spooky Veggie Plate Idea turns a basic crudité platter into a Halloween centerpiece that people actually eat, not just photograph. You sneak in a ton of color, texture, and nutrition while everyone laughs at olive eyeballs and bell pepper fangs.
You also prep everything ahead, which saves your sanity on party day. Kids, picky eaters, and adults who usually hover near the dessert table all tend to grab at least a few veggies when they look like ghosts and monsters.
“My kids fought over the cucumber eyeballs and forgot to ask where the candy went, which counts as a Halloween miracle in my book. ★★★★★”
Ingredients You’ll Need
You can mix and match vegetables based on what you find at the store, but I’ll list what works best for spooky shapes and bright color contrast.
Veggies for the spooky shapes
-
Cauliflower florets
Use these for ghost bodies or brains. Buy pre-cut florets to save time. -
Broccoli florets
Shape these into spooky trees or monster hair. Pre-cut bags work great. -
Baby carrots
Turn these into fingers or fangs. Choose the thinner ones for better shape. -
Whole large carrots
Slice into coins for eyeballs or carve into long witch fingers. Peel them for a cleaner look. -
English cucumber
Slice into rounds for eyeballs and into sticks for bones. English cucumbers have fewer seeds and a tender skin. -
Mini cucumbers
Use these for tiny monster bodies or finger shapes. They hold their shape well. -
Red bell peppers
Cut into jagged mouths, tongues, and flames. Choose firm peppers so the pieces keep their edges. -
Orange bell peppers
Use these for pumpkin shapes or glowing eyes. They add a strong Halloween color vibe. -
Yellow bell peppers
Add these for more contrast and extra “glow” around eyes and mouths. -
Green bell peppers
Slice into stems, Frankenstein hairlines, or monster eyebrows. -
Cherry or grape tomatoes
Use these as eyeball centers, warts, or monster noses. Choose firm ones so they do not burst. -
Radishes
Slice into thin rounds for creepy eyeballs with red “veins.” Keep some whole for “bloody” monster noses. -
Sugar snap peas or snow peas
Arrange these into bat wings or skeleton ribs. They also taste sweet and crunchy, which kids love. -
Celery sticks
Use these as bones, borders, or “planks” to hold other decorations. Save the leafy tops for hair or garnish. -
Black olives (whole and sliced)
Turn these into pupils, spiders, and beetle bodies. Canned olives work perfectly and slice easily. -
Kalamata olives (optional)
Use these if you want darker, more dramatic spiders or bats.
Dips and spreads for spooky faces
-
Hummus
Use classic or roasted red pepper hummus as a base for a pumpkin face or graveyard. Store-bought hummus from brands like Sabra or your favorite local brand saves time. -
Ranch dip or Greek yogurt ranch
This works as a neutral “ghostly” background. Mix Greek yogurt with ranch seasoning for a lighter option. -
Guacamole
Use this for Frankenstein faces or swampy monster ponds. Store-bought guac works, but homemade with lime and cilantro tastes brighter. -
Spinach or herb dip
This gives you a darker green base for cauldrons or slime pits. -
Black bean dip or refried black beans
Spread this in a small bowl for a “cauldron” or dark pit. Thin with a little lime juice if it feels too thick.
Pantry extras and edible decorations
-
Pretzel sticks
Use these as broom handles, bones, or fence posts around your veggie graveyard. -
Sunflower seeds or pumpkin seeds (pepitas)
Sprinkle these as “gravel” or monster teeth. Toasted seeds add nice crunch. -
String cheese or mozzarella sticks
Pull these into strips for mummy wraps or bones. -
Cheddar cheese slices
Cut these with a small knife or cookie cutters into pumpkins, tombstones, or bats. -
Candy eyeballs (optional)
Use these if you feel okay mixing a little candy with your veggie plate. Place them on top of hummus or guac faces. -
Toothpicks or small skewers
Use these to secure stacked eyeballs, spiders, or mini veggie monsters.
Equipment list
- Large serving platter, cutting board, or baking sheet
- Small bowls or ramekins for dips
- Sharp chef’s knife
- Small paring knife for details and carving
- Small round cutters or piping tips for perfect circles (optional but helpful)
- Paper towels for drying veggies so dips stick better
- Small spoons or offset spatula for spreading dips
Tips & Tricks
- Pat veggies dry with paper towels so olives, seeds, and candy eyes stick and do not slide.
- Use a mix of flat items (sliced peppers, cucumbers) and tall items (broccoli, cauliflower) to add height and interest.
- Keep all “face” pieces large and simple so they stay recognizable from a distance.
- Group veggies by color first, then carve a few into shapes so the platter still looks full even after people start snacking.
- Prep veggies and dips in advance, then assemble the spooky scene within 1 to 2 hours of serving.
- Use hummus or guac as “glue” to hold eyeballs, olive spiders, and seeds in place.
- Build one or two big focal points, like a veggie skeleton and a hummus pumpkin, instead of ten tiny scenes that feel cluttered.
- Keep a small container of extra eyeballs, olives, and seeds nearby so you can repair faces after people start eating.
- Offer at least two dips so both ranch lovers and hummus fans feel happy.
- Use a rimmed baking sheet lined with parchment if you need to transport the Spooky Veggie Plate Idea to a party.
How to Make Spooky Veggie Plate Idea
Step 1: Prep and slice the veggies
Wash and dry all vegetables thoroughly so water does not dilute your dips. Slice cucumbers into rounds for eyeballs and sticks for bones. Cut carrots into coins and sticks, then trim celery into short bone-like pieces.
Slice bell peppers into rings, strips, and a few large flat panels that you can carve into mouths or jack-o-lantern faces. Cut broccoli and cauliflower into bite-size florets. Keep everything in separate piles by color so assembly feels easier.
Step 2: Set up the platter base
Place small bowls of hummus, ranch, guacamole, and any other dips on your serving platter first. Space them out so you can build scenes around each bowl. Think of each bowl as a mini stage for a spooky character.
Spread hummus in one shallow bowl and smooth the top so it looks like a blank canvas. Do the same with guacamole in another bowl. If you use a large cutting board or baking sheet, place dips slightly off-center so the platter looks interesting.
Step 3: Build a veggie skeleton
Choose the center of your platter for the skeleton body. Use a small ramekin of ranch or hummus as the head and smooth the top. Place two cucumber rounds as eyes and add sliced olives as pupils.
Use thin carrot sticks or celery sticks to form the spine and ribs. Line up curved sugar snap peas or celery ribs on each side of the spine to mimic a rib cage. Add baby carrots or celery sticks as arms and legs, then use small cauliflower florets or string cheese pieces as hands and feet.
Step 4: Make a hummus jack-o-lantern
Take your hummus bowl and shape the top into a slight dome with a spoon. Arrange orange bell pepper strips in a circle around the edge of the bowl to form a pumpkin outline. Use smaller pieces of orange pepper to fill in any gaps so the pumpkin looks solid.
Cut triangles from yellow or red bell pepper for eyes and a nose. Add a jagged mouth from a strip of red pepper. Place a small green pepper strip or celery piece at the top as a stem.
Step 5: Craft Frankenstein or monster faces
Spread guacamole in a shallow bowl and smooth the surface. Line the top edge with chopped broccoli florets to create wild monster hair. Add two cucumber slices as eyes and top them with olive slices or candy eyeballs.
Use a strip of red bell pepper as a mouth and place two small cauliflower florets or cheese chunks as bolts on each side of the bowl. Add a thin strip of black olive across the forehead as a scar. Press a few pumpkin seeds into the guac as “stitches.”
Step 6: Build olive spiders and creepy eyeballs
Slice black olives in half for spider bodies. Cut a few olives into thin strips for legs. Place one olive half on a cucumber round or carrot coin, then arrange eight tiny strips around it as legs.
Make bloodshot eyeballs with radish or cucumber slices. Add a small dollop of hummus or ranch in the center, then press in half a cherry tomato or an olive slice as the pupil. Use a toothpick dipped in a bit of beet juice or hot sauce to draw thin red “veins” if you want extra drama.
Step 7: Fill in the gaps with color and crunch
Surround your skeleton, pumpkin, and monster faces with piles of broccoli, cauliflower, carrots, and snap peas. Keep similar colors together in small clusters so the platter looks intentional, not random. Use celery sticks and pretzel sticks to form fences, borders, or grave outlines.
Tuck cherry tomatoes, radishes, and extra cucumber slices into any empty spaces. Sprinkle sunflower seeds or pumpkin seeds around the edges as gravel or scattered “teeth.” Add a few string cheese mummies by wrapping thin cheese strips around baby carrots and sticking on tiny olive eyes.
Step 8: Chill and serve
Cover the finished Spooky Veggie Plate Idea loosely with plastic wrap. Chill it in the fridge for up to 2 hours before serving so everything stays crisp. Right before guests arrive, uncover the platter and check for any pieces that shifted.
Press any loose eyeballs or spiders back into place with a bit of hummus as glue. Place small tongs or toothpicks nearby so people can grab pieces easily. Snap a quick photo, then step back and watch everyone attack the veggie monsters.
What to Serve with Spooky Veggie Plate Idea
Serve this Spooky Veggie Plate Idea with other Halloween snacks like baked sweet potato fries, mini turkey or veggie sliders, and a big pot of tomato soup or chili. Offer a few fun drinks such as sparkling water with floating orange slices, apple cider, or a simple punch with fruit. Add a bowl of whole grain crackers or pita chips so guests can scoop up dips along with the veggies.
You can also pair the platter with cheese cubes, deviled eggs decorated as eyeballs, and a fruit tray shaped like a candy corn pattern. This mix gives your party table balance so people enjoy treats and still feel good the next morning.
Storage Options
- Store leftover veggies in airtight containers in the fridge for up to 3 to 4 days, keeping wet items like tomatoes separate from dry items like carrots.
- Keep dips in sealed containers in the fridge for 3 to 5 days, depending on the type and any package directions.
- Avoid freezing raw veggies for this platter, since thawing turns them soft and watery.
- Reuse leftover veggies in salads, stir fries, omelets, or snack boxes, and stir leftover dips into grain bowls or spread them on sandwiches.