
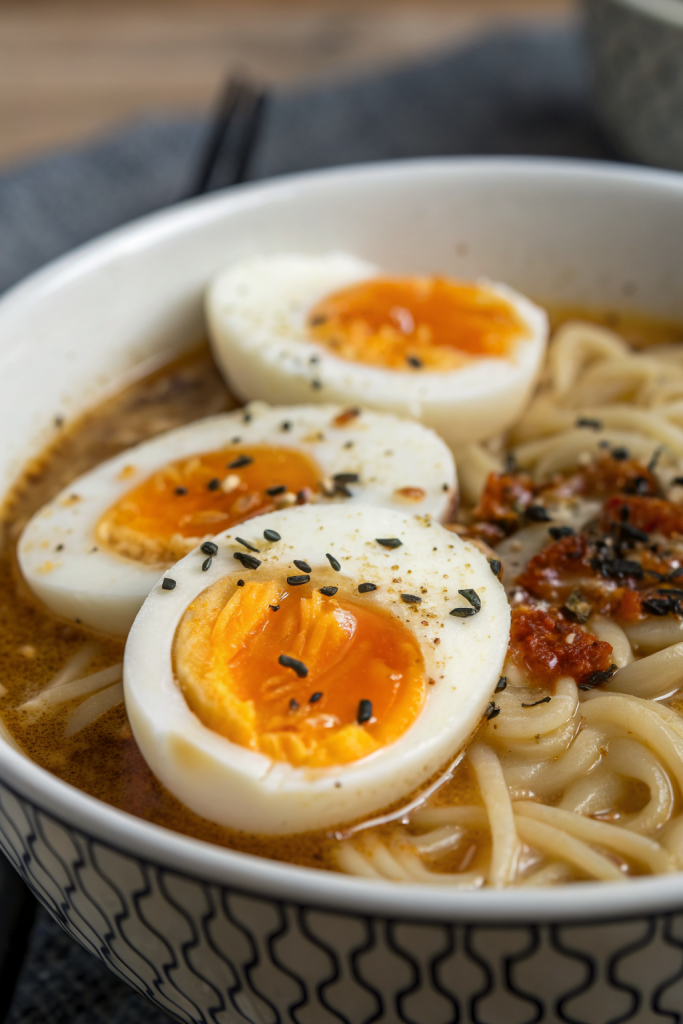
Ajitama Japanese Ramen Egg Recipe hits that perfect sweet-salty umami note with a jammy, custardy yolk that practically melts over hot noodles. It works for busy home cooks who want a restaurant-style ramen topping in about 30 minutes of active time plus a short marinade. I still remember the first time I nailed that glowing orange yolk and did a tiny victory dance in my kitchen.
Why Ajitama Japanese Ramen Egg Recipe Is Worth It
These marinated ramen eggs turn a simple bowl of noodles into something that tastes like it came from a tiny Tokyo shop with a long line outside. The soy-based marinade soaks into the whites, while the yolk stays soft and rich, so every bite hits with savory depth.
You can prep a batch on Sunday and eat like a ramen pro all week with almost no extra effort. The recipe uses basic pantry staples, and you only need one pot and a zip-top bag or small container.
The Ajitama Japanese Ramen Egg Recipe gives my weeknight instant noodles a serious upgrade—better than most restaurant eggs I’ve tried. ★★★★★
Ingredients You Need
Eggs
- 6 large eggs
- Use the freshest eggs you can, but not farm-stand super fresh; eggs that sit in the fridge 3–5 days peel easier.
- Size matters here; large eggs cook most consistently with the timing below.
Marinade
- 1/2 cup low-sodium soy sauce
- Low-sodium gives control over salt; with regular soy, add 2–3 tablespoons water.
- 1/2 cup water
- 1/4 cup mirin (Japanese sweet rice wine seasoning; look in the Asian aisle)
- If you skip alcohol, use 3 tablespoons sugar plus 1 tablespoon rice vinegar instead.
- 2 tablespoons sake (optional but tasty)
- If you avoid alcohol, replace with 2 tablespoons water and a pinch more sugar.
- 1–2 tablespoons sugar (adjust to taste; I like 1 1/2 tablespoons)
- 1 clove garlic, lightly smashed
- 1 small knob ginger (about 1-inch), sliced
- 1 green onion, cut into 2–3 pieces
- 1 teaspoon toasted sesame oil (adds aroma; a little goes a long way)
Optional flavor boosters
- 1 small piece dried kombu (kelp), wiped clean
- 1–2 dried shiitake mushrooms
- 1/2 teaspoon chili flakes or a small piece of dried chili for a gentle kick
Equipment
- Medium saucepan or small pot (to boil eggs)
- Slotted spoon
- Large bowl with ice water (ice bath)
- Measuring cups and spoons
- Small saucepan (for marinade, optional if you just mix cold)
- Zip-top bag or small container deep enough to submerge eggs
- Timer (your phone works; timing matters)
Quick Tips & substitutions
- Use fridge-cold eggs for more predictable soft yolks.
- Prick the wide end of each egg with a thumbtack or pushpin to reduce cracking and make peeling easier.
- Stir the water gently in one direction before adding eggs so they sit in the center and cook evenly.
- Keep the water at a gentle boil, not a wild one, to protect the shells.
- Aim for 6 1/2–7 minutes for jammy yolks; go 8 minutes if you prefer more set centers.
- Drop eggs straight into an ice bath after boiling and chill at least 10 minutes before peeling.
- Swap mirin with a mix of sugar and rice vinegar if you do not use alcohol.
- Use tamari instead of soy sauce for a gluten-free version.
- Skip garlic and ginger if you want a cleaner, lighter flavor; keep soy, mirin, and sugar as the base.
- Reuse the marinade once more within 3 days for a second batch of eggs; boil it and cool it again before reuse.
How to Make Ajitama Japanese Ramen Egg Recipe
Step 1: Mix the marinade
Add soy sauce, water, mirin, sake (if using), and sugar to a small saucepan or mixing bowl. Stir until the sugar dissolves. Toss in garlic, ginger, green onion, sesame oil, and any optional kombu, shiitake, or chili.
If you heat the marinade, bring it just to a light simmer, then turn off the heat and cool it completely. Cool marinade fully before it touches the eggs so the eggs do not overcook.
Step 2: Boil the eggs
Fill a medium saucepan with enough water to cover the eggs by about 1 inch. Bring the water to a strong simmer over medium-high heat. While the water heats, set up a large bowl with ice and cold water nearby.
Gently prick the wide end of each egg with a thumbtack or pushpin. When the water simmers, lower the heat slightly so the bubbles stay steady but not aggressive. Stir the water in one direction, then gently lower the eggs into the center with a spoon and start the timer.
- 6 1/2 minutes: very soft, jammy yolk with a slightly runny center
- 7 minutes: jammy, custardy yolk (my go-to)
- 8 minutes: more set but still creamy
Keep the heat steady so the water continues to bubble gently the entire time.
Step 3: Chill and peel
When the timer goes off, scoop the eggs out with a slotted spoon and drop them straight into the ice bath. Let them sit at least 10–15 minutes so the shells release and the centers stop cooking. Peel the eggs under a thin stream of running water or in the bowl of water to help the shells slide off.
Tap the egg all over to crack the shell, then start peeling from the wide end where the air pocket sits. Take your time and keep the membrane intact as much as possible; it holds the white together. If an egg tears a little, still use it; the marinade still works its magic.
Step 4: Marinate the eggs
Place the peeled eggs in a zip-top bag or snug container. Pour the cooled marinade over the eggs so they sit fully covered; tuck kombu or shiitake around them if you use those. If you use a bag, press out extra air so the liquid hugs the eggs.
Chill the eggs in the fridge at least 4 hours, though overnight gives deeper flavor and color. Rotate the eggs once or twice if they do not sit fully submerged. Taste one after 8–12 hours and decide if you want a stronger flavor before extending the soak.
Step 5: Serve
When you feel happy with the flavor, pull the eggs from the marinade. Pat them dry gently with a paper towel. Slice them in half lengthwise with a sharp, slightly damp knife for clean cuts.
Spoon them over hot ramen, rice bowls, or even avocado toast. Sprinkle with sliced green onions, sesame seeds, or a tiny pinch of chili flakes. Slurp and enjoy the soft yolk mixing into your broth or sauce.
Recipe Variations
- Gluten-free: Use tamari or a certified gluten-free soy sauce and check labels on mirin and sake.
- No alcohol: Replace mirin with sugar plus rice vinegar, and swap sake with water and a pinch more sugar.
- Low carb: Cut sugar in half and rely more on mirin and soy for flavor; use a low-sugar sweetener if you like.
- Spicy: Add chili oil, chili flakes, or a small piece of dried chili to the marinade.
- Extra umami: Add kombu and dried shiitake to the marinade and let them sit the full time.
- Garlic-forward: Double the garlic and slice it instead of smashing for a stronger hit.
- Miso twist: Whisk 1 tablespoon white miso into the cooled marinade for a deeper savory note.
Ways to Serve Ajitama Japanese Ramen Egg Recipe
- Halved on top of a steaming bowl of shoyu, miso, or tonkotsu-style ramen.
- Over instant ramen to make it feel like a real meal instead of a college flashback.
- Sliced over warm rice with soy sauce, furikake, and avocado for a quick lunch.
- On top of cold soba or udon with cucumbers and shredded nori.
- As a protein snack straight from the fridge with a sprinkle of flaky salt and chili flakes.
- On toast with mashed avocado, sesame seeds, and a drizzle of chili crisp.
Storage Success
Store the Ajitama Japanese Ramen Eggs in an airtight container in the fridge. Keep them either in a bit of marinade or pat them dry and store them plain if they already taste strong enough. Eat them within 3–4 days for the best texture and flavor. If the marinade darkens or smells off, toss it and mix a fresh batch next time.
Ajitama Japanese Ramen Egg Recipe
Ingredients
Instructions
- In a small saucepan or mixing bowl, combine the soy sauce, water, mirin, sake (if using), and sugar, stirring until the sugar dissolves.
- Add the garlic, sliced ginger, green onion, sesame oil, and any optional kombu, dried shiitake, or chili flakes.
- If heating, bring the mixture just to a light simmer, then remove from heat and let it cool completely before using to avoid overcooking the eggs.
- Fill a medium saucepan with enough water to cover the eggs by about 1 inch and bring to a strong simmer over medium-high heat.
- Prepare a large bowl with ice and cold water to use as an ice bath.
- Gently prick the wide end of each cold egg with a thumbtack or pushpin to help prevent cracking and make peeling easier.
- Lower the heat so the water stays at a steady but not aggressive simmer. Stir the water in one direction, then gently lower the eggs into the center and start a timer.
- Cook the eggs for 6 1/2 to 7 minutes for jammy, custardy yolks, or up to 8 minutes for a more set but still creamy center, maintaining a gentle simmer the whole time.
- When the timer goes off, use a slotted spoon to transfer the eggs immediately to the ice bath.
- Let the eggs chill for at least 10–15 minutes so they stop cooking and the shells loosen.
- Tap each egg all over to crack the shell, then peel under a thin stream of running water or in a bowl of water, starting from the wide end where the air pocket is.
- Place the peeled eggs in a zip-top bag or snug container.
- Pour the completely cooled marinade over the eggs, making sure they are fully submerged. Press out excess air if using a bag so the liquid hugs the eggs.
- Refrigerate for at least 4 hours, preferably overnight, rotating the eggs once or twice if they are not completely covered, until they reach your desired flavor and color.
- Remove the eggs from the marinade and gently pat dry with a paper towel.
- Slice each egg in half lengthwise with a sharp, slightly damp knife for clean cuts.
- Serve over hot ramen, rice bowls, noodles, or enjoy as a savory snack.
Notes
Approximate per egg (1 of 6): 90–100 calories; fat 6 g; saturated fat 2 g; carbohydrates 3 g; fiber 0 g; sugars 2 g; protein 7 g; sodium 420–520 mg. Values are estimates and will vary based on exact soy sauce, mirin, and portion of marinade absorbed.