
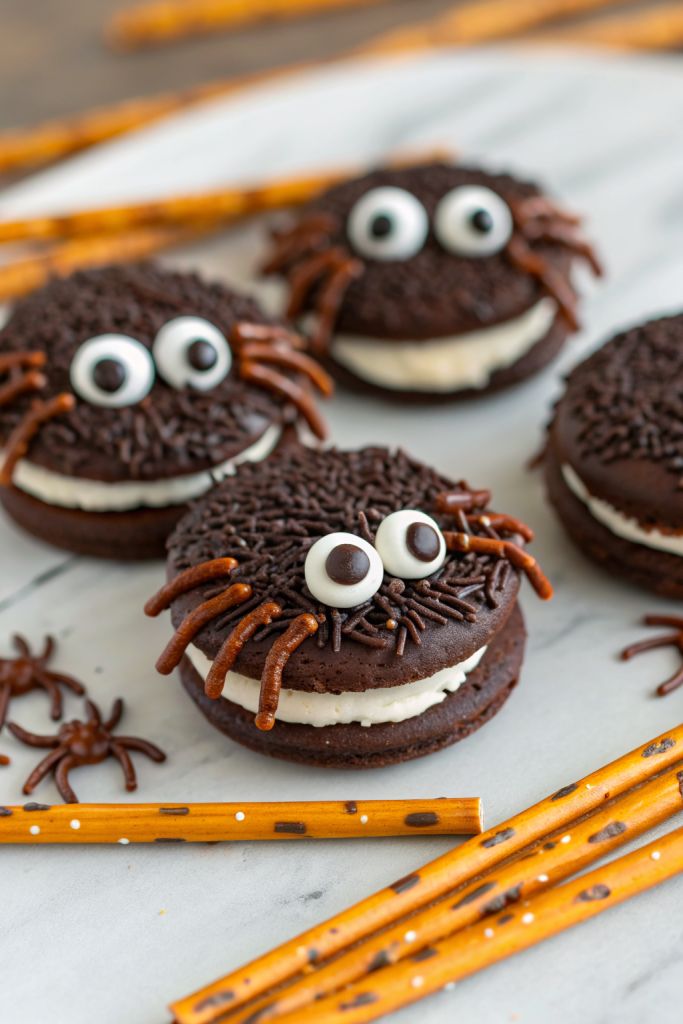
Spooky Oreo Spider Halloween Cookies Recipe tastes like a cookies-and-cream candy bar with crunchy chocolate legs and a sweet, creamy center. It works perfectly for busy parents, classroom parties, or last-minute Halloween dessert tables, and you can finish a batch in about 30 minutes. I still remember my first batch disappearing so fast my kids accused each other of hiding them.
Why You Should Try This Spooky Oreo Spider Halloween Cookies Recipe
These Oreo spider cookies look impressively creepy, yet you assemble them in minutes with mostly store-bought ingredients. Kids can help with almost every step, which turns dessert into a fun activity instead of another item on your to-do list.
You also skip complicated baking and frosting, so the recipe fits beginners and seasoned bakers who just want a cute treat without stress. The cookies travel well, so you can pack them for school parties, potlucks, or office snack tables without worrying about frosting sliding off.
“These spooky Oreo spider Halloween cookies disappeared from the party table in ten minutes and stole the show from every fancy dessert there. ★★★★★”
Ingredients You’ll Need
You can adjust this Spooky Oreo Spider Halloween Cookies Recipe easily, so use what you have and keep it simple.
Cookies & Filling
- 24 Oreo cookies
- Use classic Oreos for the best structure.
- Double Stuf works, but the thicker filling sometimes slides, so chill them first.
- Store-brand chocolate sandwich cookies also work if they feel crisp and sturdy.
- 24 mini peanut butter cups or chocolate truffles
- These form the spider bodies.
- Use peanut-free chocolate candies if you need an allergy-friendly version.
- 24 candy eyes
- You can find these in the baking aisle near sprinkles.
- If you cannot find them, use mini chocolate chips or white chocolate chips with a dot of melted chocolate.
“Legs” & Decoration
- 1 to 1 ½ cups chocolate frosting, store-bought or homemade
- Chocolate fudge frosting pipes nicely and holds the legs in place.
- You can also use canned chocolate ganache-style frosting if you like a richer flavor.
- 1 cup black or brown licorice laces, cut into short pieces
- Use thin, flexible laces so they bend easily.
- If you dislike licorice, use pretzel sticks, thin chocolate-covered biscuit sticks, or piped chocolate legs instead.
- Optional: Halloween sprinkles or colored sanding sugar
- Sprinkle a little around the spiders if you want a more festive cookie platter.
Pantry Shortcuts & Substitutions
- Use pre-made fudge icing in a piping bag if you want zero mixing or cleanup.
- Swap Oreo flavors: try dark chocolate, Halloween orange filling, or even mint for a different twist.
- Use candy-coated chocolates for eyes if you draw pupils with a food-safe marker.
Equipment List
- Small microwave-safe bowl (for softening frosting or melting a bit of chocolate)
- Piping bag fitted with a small round tip, or a zip-top bag with a tiny corner snipped off
- Small offset spatula or butter knife
- Kitchen scissors (to cut licorice or pretzel legs)
- Baking sheet or large tray lined with parchment paper
- Small spoon or toothpick for detail work
- Refrigerator space to chill the cookies so they set quickly
Tips & Tricks
- Chill the Oreo cookies and peanut butter cups for 10 to 15 minutes so they stay firm while you decorate.
- Use slightly softened frosting so it pipes smoothly but still holds its shape.
- Cut all the licorice legs before you start assembly so you can work quickly and keep the frosting from drying.
- Aim for 6 to 8 legs per spider; 8 looks authentic, but 6 still looks cute and saves time.
- Press the candy eyes into the frosting while it feels soft so they stick without sliding.
- If the frosting feels too soft, pop the piping bag in the fridge for 5 minutes and try again.
- Keep a damp paper towel nearby and wipe your fingers often so you do not smudge chocolate on the cookies.
- Let the finished spiders chill on a parchment-lined tray for at least 15 minutes so everything sets before you move them.
- Use a toothpick to fix any frosting smears or to draw tiny fangs under the eyes.
- Involve kids with safe tasks like placing eyes and bodies, and handle the scissors and piping yourself if they feel too tricky for small hands.
How to Make Spooky Oreo Spider Halloween Cookies Recipe
Step 1: Set up your decorating station
Line a baking sheet or large tray with parchment paper. Arrange the Oreo cookies in a single layer so you can work assembly-line style. Place the peanut butter cups, candy eyes, and licorice legs in small bowls within easy reach.
Spoon the chocolate frosting into a piping bag fitted with a small round tip, or into a zip-top bag with a tiny corner snipped off. If the frosting feels very stiff, warm it in the microwave for 5 to 10 seconds, then stir until smooth.
Step 2: Attach the spider bodies
Pipe a quarter-sized dot of frosting on top of each Oreo cookie. Press one mini peanut butter cup or chocolate truffle onto the frosting, wide side down, to form the spider body. Give each one a gentle twist so the frosting spreads under the candy and grips it.
Work through all the cookies so every Oreo has a body. If the candies slide, chill the tray for 5 to 10 minutes, then continue.
Step 3: Add the legs
Cut the licorice laces into short pieces, about 1 ½ to 2 inches long, so they look like spider legs. You need 6 to 8 pieces per cookie, depending on how many legs you want.
Pipe small lines of frosting along the sides of the peanut butter cup where the legs will attach. Press the ends of the licorice pieces into the frosting, three or four on each side, and angle them slightly outward so they look like they crawl.
If you use pretzel sticks instead of licorice, break them into shorter pieces first. Press them into the frosting the same way, and add a little extra frosting if they feel heavy.
Step 4: Give the spiders faces
Pipe a small dot of frosting on the front of each peanut butter cup where you want the eyes. Gently press two candy eyes into the frosting so they sit side by side.
If you use chocolate chips, press them in upside down so the flat side faces out. Add a tiny dot of melted chocolate or colored icing in the center for pupils if you want extra detail.
You can also pipe tiny fangs or a crooked smile under the eyes with a toothpick dipped in frosting. Kids love the silly faces, especially if some spiders look grumpy and some look surprised.
Step 5: Chill and decorate the platter
Place the finished spiders on the parchment-lined tray. Chill them in the fridge for 15 to 20 minutes so the frosting firms up and the legs stay in place.
Once they set, arrange the spiders on a serving platter. Scatter Halloween sprinkles or colored sanding sugar around them to fill any gaps and make the tray look full and festive.
If you need to travel with them, keep them on the tray, cover loosely with plastic wrap, and transport them flat so the legs do not shift.
What to Serve with Spooky Oreo Spider Halloween Cookies Recipe
Serve these spooky Oreo spider Halloween cookies with cold milk, hot cocoa, or a big pitcher of apple cider. Kids love a treat board, so add sliced apples, grapes, cheese cubes, and a bowl of popcorn around the spiders. You can also pair them with other no-bake Halloween snacks like mummy pretzels or monster marshmallow pops for a full dessert spread. If you host a party, set up a small decorating station so guests can add extra sprinkles or candy to their own spider cookie.
Storage Options
- Store the cookies in a single layer in an airtight container in the fridge for up to 4 days.
- If you need to stack them, separate layers with parchment paper so the legs and eyes stay intact.
- Freeze the decorated cookies on a tray until firm, then transfer them to a freezer-safe container for up to 1 month.
- Thaw frozen cookies in the fridge so condensation does not make the Oreos soggy.
- Serve chilled or at cool room temperature; avoid direct sunlight or warm spots so the frosting and candy bodies keep their shape.
Spooky Oreo Spider Halloween Cookies Recipe
Ingredients
Instructions
- Line a baking sheet or large tray with parchment paper and arrange the Oreo cookies in a single layer.
- Place the mini peanut butter cups or chocolate truffles, candy eyes, and licorice legs into small bowls within easy reach.
- Spoon the chocolate frosting into a piping bag fitted with a small round tip, or into a zip-top bag with a tiny corner snipped off. If the frosting feels very stiff, warm it in the microwave for 5 to 10 seconds, then stir until smooth.
- Pipe a quarter-sized dot of frosting on top of each Oreo cookie.
- Press one mini peanut butter cup or chocolate truffle onto the frosting, wide side down, to form the spider body. Give each one a gentle twist so the frosting spreads underneath and grips it.
- Repeat until every Oreo has a candy body. If the candies slide, chill the tray for 5 to 10 minutes and continue.
- Cut the licorice laces into short pieces, about 1 1/2 to 2 inches long, to resemble spider legs. Plan for 6 to 8 legs per cookie.
- Pipe small lines of frosting along the sides of each candy body where you want the legs to attach.
- Press the ends of the licorice pieces into the frosting, three or four on each side, angling them slightly outward so they look like crawling spider legs.
- Pipe a small dot of frosting on the front of each candy body where you want the eyes to sit.
- Gently press two candy eyes into the frosting so they sit side by side.
- If you like, use a toothpick dipped in frosting to add tiny fangs or a crooked smile beneath the eyes.
- Place the finished spider cookies on the parchment-lined tray and chill in the refrigerator for 15 to 20 minutes so the frosting firms up and the legs stay in place.
- Once set, arrange the spider cookies on a serving platter and scatter Halloween sprinkles or colored sanding sugar around them for decoration.
- Serve chilled or at cool room temperature.
Notes
Approximate per cookie (1 of 24): 150–170 calories; fat 8–10 g; saturated fat 4–6 g; carbohydrates 18–22 g; fiber 1 g; sugars 13–16 g; protein 2–3 g; sodium 90–130 mg. Values will vary based on specific cookie brand, frosting type, and choice of candy bodies and decorations.