
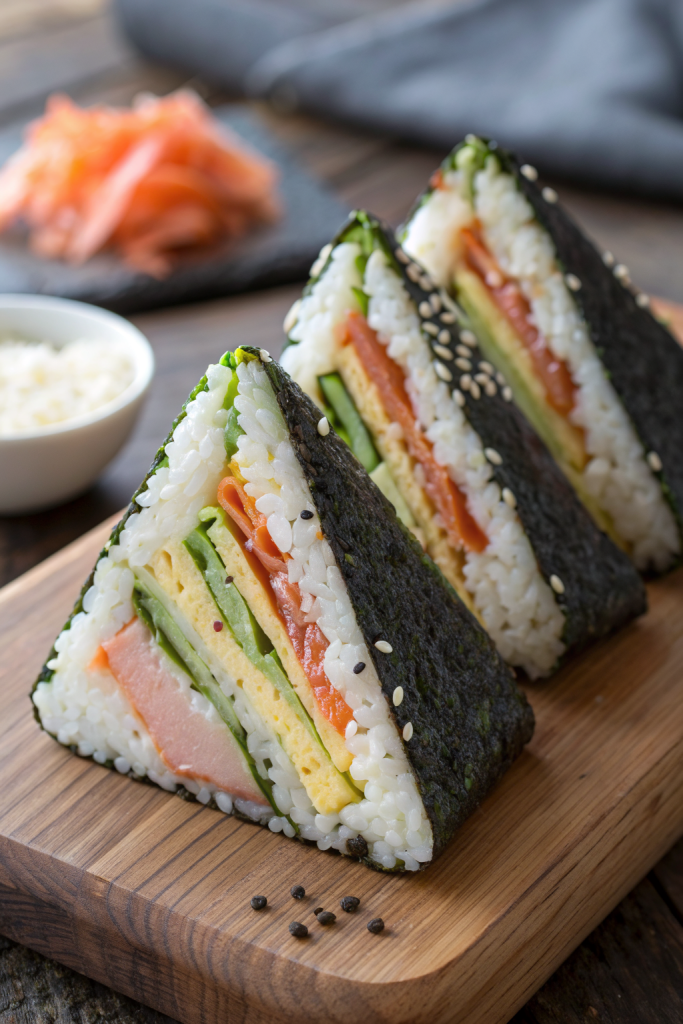
Onigirazu Recipe tastes like a sushi roll and a sandwich had a very delicious, slightly messy baby, and it works for busy folks who want a fast, portable meal in about 35 minutes. It fits meal preppers, lunchbox packers, picky teens, and anyone who loves bold flavor without a ton of fuss. I tested this version during a week of back-to-back soccer practices, and my family still talks about “those rice sandwiches” like they saved their lives.
Why You Should Try This Onigirazu Recipe
This Onigirazu Recipe packs all the flavor of sushi with none of the rolling stress. You wrap seasoned rice and fillings in nori like a little edible gift, and every bite hits salty, savory, and slightly sweet notes.
You can customize each square for different tastes, so one batch can feed a vegetarian, a spicy tuna fan, and a teriyaki chicken lover at the same time. It travels well in lunch boxes, tastes great at room temperature, and feels way more exciting than another sad desk salad.
“This Onigirazu Recipe turned my boring lunches into the highlight of my workday, and my coworkers now side-eye their sandwiches. ★★★★★”
Ingredients You’ll Need
Rice & Seasoning
- 2 cups uncooked short-grain Japanese rice
- Use sushi rice or Calrose rice for the right stickiness.
- 2 1/4 cups water
- 3 tablespoons rice vinegar
- I like Marukan or Kikkoman, but any plain rice vinegar works.
- 1 tablespoon sugar
- 1 teaspoon fine sea salt
Nori & Wrapping
- 4 large sheets nori (full-size sushi sheets)
- Choose roasted nori labeled “yaki nori” for better flavor.
- Small bowl of water for sealing corners
- Plastic wrap or reusable silicone sheets for shaping and storage
Protein Options (pick 1–2 per batch)
You can mix and match; I usually set up a little bar.
- 1 can (5–6 oz) tuna in water, drained
- Mix with 2–3 tablespoons Japanese mayo (Kewpie if possible), 1 teaspoon soy sauce, and a tiny squeeze of sriracha for spicy tuna.
- 1 cup cooked chicken, shredded or chopped
- Toss with 2 tablespoons teriyaki sauce or soy sauce plus 1 teaspoon sesame oil.
- 4 slices thick-cut spam, pan-seared until golden
- Brush with teriyaki or soy sauce and a pinch of sugar while it browns.
- 2 eggs, scrambled into a flat omelet and sliced
- 1 cup baked or pan-seared tofu strips
- Season with soy sauce and a little garlic powder as an easy pantry shortcut.
Veggies & Extras
- 1 small cucumber, cut into thin sticks
- 1 small carrot, julienned or shredded
- 1 avocado, sliced
- 1 cup shredded lettuce or cabbage
- 2–3 tablespoons pickled ginger or pickled radish (takuan)
- 1–2 tablespoons furikake seasoning
- Pantry shortcut: use furikake instead of chopping extra toppings.
- Soy sauce or tamari for dipping
- Toasted sesame seeds, optional
Equipment
- Fine mesh strainer for rinsing rice
- Medium saucepan with lid or rice cooker
- Cutting board
- Sharp knife
- Small bowl for water
- Plastic wrap or reusable wrap
- Nonstick skillet if you cook spam, chicken, or tofu
Tips & Tricks
- Rinse the rice until the water runs almost clear so the grains cook fluffy and not gummy.
- Spread the rice in a thin, even layer on the nori so the square folds easily and does not burst.
- Keep your hands slightly wet when you handle the rice so it does not stick to everything you own.
- Place heavier fillings like spam or chicken in the center and lighter veggies on top so the stack holds together.
- Slice with a very sharp knife and wipe the blade between cuts to keep those pretty cross-sections.
- Wrap each Onigirazu Recipe tightly in plastic wrap if you pack it for lunch so the nori stays snug around the rice.
- Use leftover rotisserie chicken, last-night stir fry veggies, or pre-cooked tofu as easy shortcuts.
- Pack sauces like soy or spicy mayo on the side so the nori does not soften too much before you eat.
How to Make Onigirazu Recipe
Step 1: Cook and Season the Rice
Rinse the rice in a fine mesh strainer until the water turns mostly clear. Add rice and water to a saucepan or rice cooker and cook according to package directions. Once the rice cooks, fluff it into a wide bowl.
Stir together rice vinegar, sugar, and salt until the sugar dissolves. Drizzle the mixture over the hot rice and gently fold with a rice paddle or spatula. Let the seasoned rice cool until warm but not steaming hot, about 10 to 15 minutes.
Step 2: Prep Fillings
While the rice cools, mix your protein. Stir tuna with Japanese mayo, soy sauce, and sriracha if you want a spicy kick. Toss cooked chicken with teriyaki sauce, or pan-sear spam slices in a skillet until both sides turn golden.
Slice cucumber, carrot, and avocado and set them on a plate. Shred lettuce or cabbage and pat it dry so it does not water down the rice. Lay out any extras like pickled ginger, furikake, and sesame seeds so you can build quickly.
Step 3: Set Up the Nori and Rice Base
Lay a sheet of plastic wrap on your cutting board. Place one sheet of nori in the center, shiny side down, with a corner pointing toward you so it looks like a diamond. Wet your fingers lightly.
Scoop about 1/2 cup of rice into the center of the nori. Shape it into a square about 3 to 4 inches across, keeping it slightly thinner at the edges. Sprinkle a pinch of furikake over the rice if you like extra flavor.
Step 4: Add Fillings in Layers
Place your protein of choice on top of the rice square. Add veggies in layers, such as cucumber sticks, carrot, avocado, and lettuce. Keep the stack neat and no taller than about 1 1/2 inches so the nori folds without tearing.
If you use saucy fillings, keep the sauce in the middle and away from the nori edges. Add pickled ginger or radish for brightness. Finish with another thin layer of rice on top, about 1/4 to 1/3 cup, to sandwich everything.
Step 5: Fold into a Neat Square
Use the plastic wrap to help you. Fold the bottom corner of the nori up over the fillings, then fold the top corner down. Fold the left and right corners over to form a tight square package.
Wet your fingers and press on any dry corners so they stick. Wrap the square tightly in plastic wrap and press gently to compact the rice and fillings. Let it sit for 5 to 10 minutes so everything settles.
Step 6: Slice and Serve
Use a sharp knife and cut each Onigirazu Recipe square in half on the diagonal or straight down the middle. Wipe the blade between cuts for clean edges. Keep the plastic wrap on if you pack them for lunch, or peel it off right before serving.
Serve with small containers of soy sauce, spicy mayo, or a simple mix of soy and a few drops of sesame oil. Add some sliced fruit or a small salad on the side for a complete meal. Enjoy the mix of textures from crisp veggies, tender rice, and savory protein in every bite.
What to Serve with Onigirazu Recipe
Serve this Onigirazu Recipe with miso soup, a simple cucumber salad, or edamame for a light and balanced meal. Fresh fruit like orange slices, grapes, or apple wedges pairs nicely and keeps the meal kid friendly. You can also add a small bowl of seaweed salad or steamed veggies for extra color and nutrition.
If you pack these for lunch, tuck in some cherry tomatoes, snap peas, or a small container of yogurt. The variety makes the meal feel fun and satisfying without much extra work.
Storage Options
- Store leftover Onigirazu Recipe tightly wrapped in plastic wrap or reusable wraps in the fridge for up to 24 hours for best texture.
- Keep the rice and fillings separate in airtight containers for up to 3 days, then assemble fresh when you want to eat.
- Freeze plain rice squares and cooked proteins separately for up to 1 month, then thaw in the fridge and assemble with fresh veggies.
- Reheat spam or chicken fillings in a skillet or microwave until warm, then build the Onigirazu Recipe and enjoy at room temperature rather than hot.