
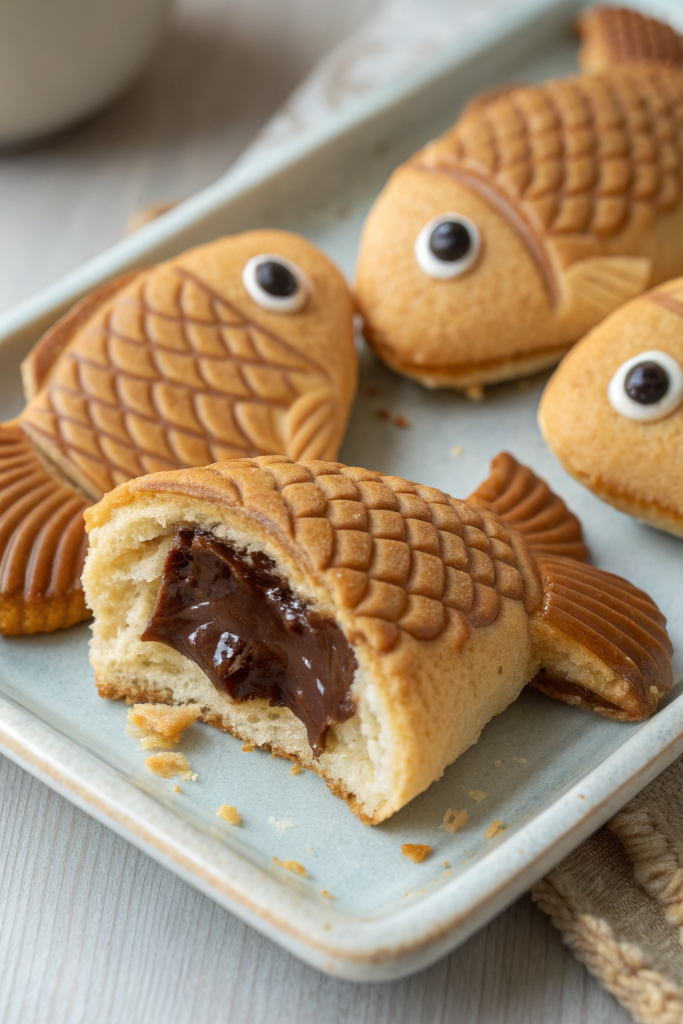
Taiyaki Japanese Fish Dessert Recipe tastes like a warm waffle cone hugged around creamy custard or gooey red bean, and it feels like street food happiness in your hand. It works perfectly for home bakers who want a fun weekend project, and you can finish a batch in about 1 hour once you get into a rhythm. I still remember burning my fingertips on my first homemade taiyaki and grinning like a kid anyway.
Why Make This Taiyaki Japanese Fish Dessert Recipe at Home
Homemade taiyaki tastes fresher and lighter than most versions from street stalls or frozen boxes. You control the sweetness, the fillings, and how crispy or fluffy the batter turns out, which makes a big difference.
You also turn dessert into an activity, not just a result. Kids love filling the little fish molds, adults love customizing fillings, and everyone loves eating the slightly imperfect, “oops I overfilled it” ones.
This Taiyaki Japanese Fish Dessert Recipe gives crisp edges, fluffy centers, and a nostalgic street snack vibe that tastes better than any frozen version ★★★★★
Ingredients You Need
Batter ingredients
- 1 cup all purpose flour
- 1 tablespoon cornstarch
- 1 teaspoon baking powder
- 2 tablespoons sugar
- 1 pinch fine sea salt
- 1 large egg, room temperature
- 3/4 cup milk, room temperature
- Use whole milk for richer flavor, or 2 percent if you prefer a lighter texture.
- 1 tablespoon neutral oil
- Use canola, vegetable, or grapeseed oil. Avoid strong oils like olive oil.
- 1 teaspoon vanilla extract
- Use pure vanilla if possible; imitation works in a pinch but tastes sharper.
Classic sweet red bean filling
- 3/4 cup sweetened red bean paste (anko)
- Use tsubuan (chunky) for texture or koshian (smooth) for a creamier bite.
- Shelf stable canned anko from Japanese or Asian markets works great.
Custard filling option
- 1 cup whole milk
- 2 egg yolks
- 3 tablespoons sugar
- 1 1/2 tablespoons cornstarch
- 1 teaspoon vanilla extract
- 1 tablespoon unsalted butter
You can also use store bought pastry cream or thick vanilla pudding when you feel short on time.
Optional fillings
- Chocolate hazelnut spread
- Peanut butter or other nut butters
- Thick fruit jam
- Sweet cream cheese
- Matcha custard or matcha pastry cream
- Small mochi pieces with a bit of anko
Equipment list
- Taiyaki pan with fish shaped molds
- Cast iron holds heat best and gives crisp edges. Nonstick aluminum works but needs gentler heat.
- Small ladle or spouted measuring cup for batter
- Small spoon for filling
- Heatproof brush or folded paper towel for oiling the pan
- Mixing bowls
- Whisk
- Small saucepan (for custard)
- Rubber spatula
- Cooling rack
Tips & Mistakes
- Preheat the taiyaki pan fully so the batter puffs and browns instead of turning pale and dense.
- Lightly oil the molds; too much oil makes greasy taiyaki and causes weird bubbles.
- Mix the batter just until smooth; overmixing develops gluten and gives chewy, tough fish.
- Use room temperature milk and egg so the batter cooks evenly and browns nicely.
- Keep the batter slightly thicker than pancake batter; thin batter leaks and loses shape.
- Do not overfill the molds with batter; aim for about 60 to 70 percent full before adding filling.
- Place the filling in the center and keep it away from the edges so it does not burst out.
- Use low to medium heat; high heat burns the outside before the center cooks.
- Flip the pan gently and only once; constant flipping knocks out air and flattens the taiyaki.
- Let the cooked taiyaki rest on a rack; stacking them while hot traps steam and softens the crust.
- Taste one from the first batch and adjust cooking time or heat level before you cook the rest.
- If the taiyaki sticks, add a bit more oil next round and let the bottom side cook slightly longer.
How to Make Taiyaki Japanese Fish Dessert Recipe
Step 1: Mix the batter
Add flour, cornstarch, baking powder, sugar, and salt to a mixing bowl. Whisk to combine and break up any lumps. In another bowl, whisk the egg, milk, oil, and vanilla until smooth, then pour the wet mixture into the dry ingredients and whisk just until no dry spots remain.
Let the batter rest for 10 to 15 minutes while you prep fillings and heat the pan. This short rest helps the flour hydrate and gives a more even texture. If the batter thickens too much, stir in a tablespoon of milk at a time until it flows like pancake batter.
Step 2: Prepare the custard filling (optional)
Heat milk in a small saucepan over low heat until it feels warm but not boiling. In a bowl, whisk egg yolks, sugar, and cornstarch until the mixture looks pale and smooth. Slowly pour the warm milk into the yolk mixture while you whisk, then pour everything back into the saucepan.
Cook over low heat and stir constantly with a rubber spatula until the custard thickens and coats the spatula. Take the pan off the heat, stir in vanilla and butter, and mix until smooth. Transfer the custard to a shallow dish, press plastic wrap directly on the surface, and chill until slightly thick and scoopable.
Step 3: Preheat and oil the taiyaki pan
Place the taiyaki pan over medium heat and let it heat for 3 to 5 minutes. Flick a tiny drop of water on the surface; it should sizzle and evaporate quickly. Lightly brush or wipe a thin layer of oil over each fish mold, including the edges and tail.
If you use a gas stove, keep the flame slightly lower than you would for pancakes, since the closed pan traps heat. If you use an electric stove, give the pan a bit more time to heat evenly before you start.
Step 4: Fill the molds with batter and filling
Reduce the heat to low medium. Pour batter into each fish mold until it reaches about 60 to 70 percent full. Use a small ladle or spouted cup so you control the flow and avoid spills.
Place about 1 tablespoon of red bean paste or custard in the center of each mold. Keep the filling away from the edges so the batter can seal around it. Spoon a little more batter over the filling until it just covers the top and reaches the rim of the mold.
Step 5: Cook and flip the taiyaki
Close the taiyaki pan gently. Cook the first side for about 2 to 3 minutes, then flip the pan and cook the other side for another 2 to 3 minutes. Adjust the time slightly based on your stove and pan material.
Open the pan carefully and check the color. The taiyaki should look golden brown with slightly darker edges. If they still look pale, close the pan again and cook each side for another 30 to 60 seconds.
Step 6: Cool slightly and repeat
Use chopsticks or a small silicone spatula to lift each taiyaki out of the mold and place it on a cooling rack. Let them cool for a few minutes so the outside sets and the filling thickens slightly. Re oil the molds lightly if they look dry, then repeat with the remaining batter and filling.
Taste one from the second batch and adjust heat or time if needed. You can keep finished taiyaki warm on a rack in a low oven while you cook the rest.
Variations I've Tried
I like to swirl a little matcha powder into the batter for a green tea taiyaki that pairs nicely with vanilla custard. Chocolate chip taiyaki also works well; I fold mini chocolate chips into the batter and fill the center with chocolate hazelnut spread. Peanut butter and jelly taiyaki tastes like a nostalgic sandwich in dessert form, especially when you use strawberry jam.
You can also try savory versions with cheese and mashed potato or cheese and corn, just reduce the sugar in the batter slightly. My kids love a pizza style version with mozzarella and a spoon of thick tomato sauce, cooked until the cheese melts and stretches.
How to Serve Taiyaki Japanese Fish Dessert Recipe
Serve taiyaki warm, when the outside still feels crisp and the filling feels soft and creamy. I like to dust them with a little powdered sugar or drizzle a thin line of chocolate sauce over the top. You can pair them with a scoop of vanilla ice cream, matcha ice cream, or a bowl of fresh fruit.
They also taste great at room temperature in a lunchbox or as an afternoon snack with hot green tea or iced milk tea. If you host a dessert night, set out different fillings and let everyone vote on their favorite fish.
How to store
- Cool taiyaki completely on a rack, then store in an airtight container at room temperature for up to 1 day.
- Keep in the fridge for 2 to 3 days; reheat before eating so the texture improves.
- Freeze individually wrapped taiyaki in a freezer bag for up to 1 month; press out extra air to avoid freezer burn.
- Reheat from room temperature in a toaster oven or air fryer at 350°F for 3 to 5 minutes until warm and slightly crisp.
- Reheat from frozen at 325°F for 8 to 10 minutes, or until the center feels hot; avoid the microwave if you want to keep the outside crisp.
Taiyaki Japanese Fish Dessert Recipe
Ingredients
Instructions
- In a mixing bowl, whisk together the flour, cornstarch, baking powder, sugar, and fine sea salt until well combined and free of lumps.
- In a separate bowl, whisk the egg, milk, neutral oil, and vanilla extract until smooth.
- Pour the wet mixture into the dry ingredients and whisk just until no dry spots remain. Do not overmix.
- Let the batter rest for 10 to 15 minutes so the flour hydrates. If it thickens too much, thin with a little extra milk until it flows like pancake batter.
- Heat the milk in a small saucepan over low heat until warm but not boiling.
- In a bowl, whisk the egg yolks, sugar, and cornstarch together until the mixture looks pale and smooth.
- Slowly pour the warm milk into the yolk mixture while whisking constantly, then return the mixture to the saucepan.
- Cook over low heat, stirring constantly with a rubber spatula, until the custard thickens and coats the spatula.
- Remove from the heat and stir in the vanilla extract and unsalted butter until smooth.
- Transfer the custard to a shallow dish, press plastic wrap directly on the surface, and chill until slightly thick and scoopable.
- Place the taiyaki pan over medium heat and let it preheat for 3 to 5 minutes.
- Flick a tiny drop of water on the surface; it should sizzle and evaporate quickly when the pan is ready.
- Lightly brush or wipe a thin layer of neutral oil over each fish mold, including the edges and tails.
- Reduce the heat to low medium. Pour batter into each fish mold until it is about 60 to 70 percent full.
- Place about 1 tablespoon of red bean paste or custard in the center of each mold, keeping the filling away from the edges.
- Spoon a little more batter over the filling until it just covers the top and reaches the rim of the mold.
- Close the taiyaki pan gently and cook the first side for 2 to 3 minutes over low medium heat.
- Flip the pan and cook the other side for another 2 to 3 minutes, adjusting the time as needed based on your stove and pan.
- Open the pan carefully to check the color. The taiyaki should be golden brown with slightly darker edges. If still pale, close the pan and cook each side for another 30 to 60 seconds.
- Use chopsticks or a small silicone spatula to lift each taiyaki out of the mold and place it on a cooling rack.
- Let the taiyaki cool for a few minutes so the outside sets and the filling thickens slightly.
- Repeat with the remaining batter and filling, lightly re-oiling the molds if they look dry.
- Serve the taiyaki warm, optionally dusted with powdered sugar or drizzled with chocolate sauce.
Notes
Approximate per 1 taiyaki (about 1/10 of recipe) using red bean filling: 150–170 calories; fat 5 g; saturated fat 1 g; carbohydrates 25 g; fiber 1–2 g; sugars 10–12 g; protein 4 g; sodium 90–120 mg. Values will vary based on exact fillings, brands, and portion size.